不過最近發現NTT Docomo推出了一個閒聊的交談API「雑談対話API」,可以做到連續性的閒聊,覺得很有趣,而且申請開發者是免費的。
不過畢竟因為是日本Docomo推出的,所以只支援日文,如果完全不懂日文的,就不用往下看了XD
雑談対話API介紹
能紀錄對話並持續地聊天
雑談対話API會用一個叫做context的parameter來紀錄對話的歷史,所以只要context一樣,雑談対話API會接續著跟你聊天。雑談対話API也支援日文的しりとり遊戲(根據上一個人說的單字的最後一個假名來當做第一個假名的單字遊戲,比方說いも→もの→のり,如果回答的單字是ん結尾就輸了),因此還有一個parameter來紀錄對話模式是一般對話還是しりとり遊戲。不過,可能因為蒐集到的pattern還不夠多,所以有時候還是會誤判,會有很爆笑的對話內容。
我問他推薦什麼巧克力,回我日本的未來如果是光明的就好了呢。他問我喜歡的音樂是什麼,我回Classic(古典音樂)就回我「好像要用英文來交談呢」XD整個很牛頭不對馬嘴
然後就被機器人教訓了....XDDDDDDDDDDD
好像訓練的pattern是讀到classic就會回跟禮貌有關的句子。
另外只要你回問號的話他就會很機靈(?)的轉移話題,果然很日本人XDDDDD
角色設定
雑談対話API一共有三個角色,回應你的角色可以在打API的payload中做設定。預設是一個叫做零(ゼロ)的26歲男性
讀取個人資訊功能(見人說人話)
在打payload的時候可以帶一些個人資訊過去,他就會依照你的個人資訊來回話。(比方說帶生日過去,問他幸運日是哪一天之類的)詳細的payload設定可以參考API介紹。
程式架構
開發語言是用Node.js,環境是AWS Lambda+DynamoDB。之前有人問過我怎麼用Claudia.js開發Line BOT,順道說一下目前是沒有支援的喔,也無法用Claudia-API-Builder來開發,我測試過是不行XD程式架構如下:
當Lambda經由API Gateway接收到Messaging傳來的訊息之後,先到DynamoDB搜尋這個line id是否已經有雑談対話API的context紀錄,有的話就一起傳給雑談対話API。如果正確無誤,雑談対話API會回訊,這時就把context存回DynamoDB然後再回給Messaging API。
申請Line@帳號
首先必須要先有一個Line@帳號才能使用BOT的Messaging API,一般使用者是無法使用BOT的。直接到Line@的Business Center申請就可以了,是免費的。
* Developer trial和Messaging API有什麼不同?
如果是只要回覆訊息,不用主動發訊息,那用Messaging API就可以了。但是如果想要主動發訊息,就只能選擇進階版或是先用Developer trial試試看。Developer trial有好友50人的上限,免費版則是只能有一千則訊息。申請好帳號後就可到Line@Manager 後台管理帳號。
要讓BOT帳號可以透過自訂的Web API來回應使用者,必須在Line@Manager後台中的BOT設定裡將Webhook傳訊設定為「允許」,且建議取消自動回應。
申請NTT Docomo開發者帳號
接下來就是主菜,到Docomo Developer Support Center 申請一個帳號,按下右上方的ログイン/新規登錄就可以申請帳號。Docomo接受用FB/Google的sns account,非常方便。申請帳號的時候建議要申請為法人帳號(公司帳號),限制比較少。只要填寫公司名稱/部門名稱/電話就可以,它實際上不會去追查是否是公司,所以放心的登錄吧。
登錄完之後會先收到(docomo Developer support)開発者本登録完了のお知らせ的mail,這時候就可以登錄進マイページ來申請API。
申請NTT Docomo API Developer Key
- 進入NTT Docomo Developer Support Center的マイページ,按下左邊的API利用申請・管理
- 按下“新規API利用申請"
- 選擇API 基本上如果一開始就登記為法人那所有的服務都可以申請,另外如果申請トレンド記事抽出、文字認識API,必須要填寫姓名/居住地/電話。
- 取得Key 按下申請按鈕之後開發者Key就已經產生好了,不需審核
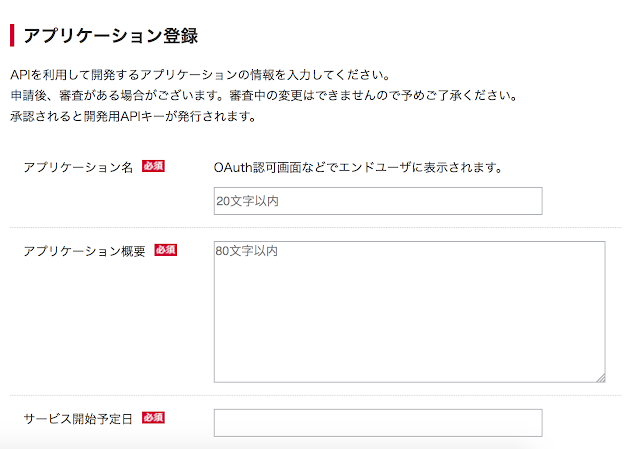
進入到申請頁面後,會要你填寫你的application名稱,說明和開始使用日期。這邊全部都可以亂填,開發key是不會審核的。但是開始使用日期可能就要考慮一下自己程式開發的進度,因為開發key只有三個月而已。
有一個必填項目コールバックURL,是如果你的Application需要讓user登錄NTT Docomo做OAuth回call用的,這邊我們因為沒用NTT帳號的功能,因此填https://dummy就可以了。アプリケーションタイプ(Application type)我是選ネイティブアプリケーション(Native application),感覺用Line BOT的話選ウェブアプリケーション(Web application)應該也可以。
Code
'use strict'
var https = require('https');
var AWS = require("aws-sdk");
AWS.config.update({
  region: "us-west-2"
});
var docClient = new AWS.DynamoDB.DocumentClient();
var dbparams = {};
    dbparams.TableName = "LineChat";
//Line access Token
const accessToken=[Line Access Token]
// Docomo雑談API
const DocomoAPIKEY = [DocomoAPIKEY];

exports.handler = function (event, context) {
    console.log('EVENT:', JSON.stringify(event, null, 2));
    var event_data=JSON.parse(event.body);;
    var reply_token = event_data.events[0].replyToken;
    console.log('reply_token:', reply_token);
    var source=event_data.events[0].source;
    console.log('source_Type',source.type);
    var receive_id = source.groupId?source.groupId:source.userId;
    console.log('receive_id:',receive_id);
    var events=event_data.events[0];
    var postData;
    console.log('type:', events.type);
    getUserName(source).then(function(userName){
        var message = events.message;
        if(message.type=="text"){
            console.log(userName);
            dbparams.Key={"userID":receive_id};
            GetFromDynamo(dbparams).then(data => {
                var context=data.Item?data.Item.context:""
                var mode=data.Item?data.Item.mode:"dialog";
                var docomo_body = {
                   "utt": message.text,
                   "nickname":userName,
                   "context":context,
                   "mode":mode
                 };
                 return queryFromDocomo(JSON.stringify(docomo_body));
            }).then(ret=>{
                console.log('docomo reply',ret);
                resetdbparams("LineChat");
                dbparams.Item={"userID": receive_id,
                            "context": ret.context,
                            "mode": ret.mode
                            };
                console.log("InsertToDynamo",dbparams);
                InsertToDynamo(dbparams);
                postData=JSON.stringify({
                            replyToken: reply_token,
                            messages: [{type: "text", text: ret.utt}]
                        });
                callLine(postData);
            });
        }
        else
        {
            console.log(message.type);
            dbparams.Key={"userID":receive_id};
            docClient.delete(dbparams, function(err, data) {
                if (err) {
                    console.error("Unable to delete item. Error JSON:", JSON.stringify(err, null, 2));
                } else {
                    console.log("DeleteItem succeeded:", JSON.stringify(data, null, 2));
                }
            });
            postData=JSON.stringify({
                replyToken: reply_token,
                messages: [
                    {
                      "type": "sticker",
                      "packageId": "2",
                      "stickerId": "154"
                    },
                    {type: "text", text: "ごめなさい。意味がわからない。。。"}]
            });
            callLine(postData);
        }
    });
};


function resetdbparams(TableName){
    dbparams = {};
    dbparams.TableName = TableName;
}
function GetPostDataByMessage(reply_token,message){
    return JSON.stringify({
            replyToken: reply_token,
            messages: [{type: "text", text: message}]
        });
}
function queryFromDocomo(docomo_body){
    return new Promise(function(resolve,reject){
        var contentLen = Buffer.byteLength(docomo_body, 'utf8');
        var rp = require('minimal-request-promise'),
            options = {
                headers: {
                    "Content-type": "application/json; charset=UTF-8",
                    "Content-Length":contentLen+''
                },
            body: docomo_body
        };
        rp.post('https://api.apigw.smt.docomo.ne.jp/dialogue/v1/dialogue?APIKEY=' + DocomoAPIKEY, options).then(
            function (response) {
                    //console.log('got response', response.body);
                    var docomoreply=JSON.parse(response.body);
                    resolve(docomoreply);
                },
            function (response) {
                console.log('got error', response.body, response.headers, response.statusCode, response.statusMessage);
                reject(response.statusMessage);
            }
        );
    });
}
function getUserName(source){
    if (source.type=='user')
    {
        return new Promise(function(resolve, reject){
            var rp = require('minimal-request-promise'),
                options = {
                    headers: {
                        "Content-type": "application/json; charset=UTF-8",
                        "Authorization": "Bearer " +accessToken
                    }
                }
        rp.get('https://api.line.me/v2/bot/profile/'+source.userId, options).then(
            function (response) {
                //console.log('got response', response.body, response.headers);

                var userData=JSON.parse(response.body);
                resolve(userData.displayName);
            },
            function (response) {
                console.log('got error', response.body, response.headers, response.statusCode, response.statusMessage);
            }
        );
        })
    }
}
function GetFromDynamo(params)
{
    return new Promise(function(resolve, reject){
        docClient.get(params, function(err, data) {
                if (err) {
                    console.log(err, err.stack);
                    reject(Error(err));
                } else {
                    console.log('get item from DynamoDB.');
                    console.log(data);
                    resolve(data);
                }
        });
    });
}
function InsertToDynamo(params)
{
    docClient.put(params, function(err, data) {
        if (err)
            console.log(JSON.stringify(err, null, 2));
        else
            console.log(JSON.stringify(data, null, 2));
    });
}
function callLine(postData){

    console.log('callLine,postData:',postData);
    var contentLen = Buffer.byteLength(postData, 'utf8');
    var rp = require('minimal-request-promise'),
        options = {
            headers: {
                "Content-type": "application/json; charset=UTF-8",
                "Content-Length":contentLen+'',
                "Authorization": "Bearer " +accessToken
            },
        body: postData
    };
    //console.log('Step:','rp has completed');
    rp.post('https://api.line.me/v2/bot/message/reply', options).then(
        function (response) {
            console.log('got response', response.body, response.headers);
        },
        function (response) {
            console.log('got error', response.body, response.headers, response.statusCode, response.statusMessage);
        }
    );
    console.log('Step:','rp posted');
}
這段Code是只處理文字訊息,會把文字訊息丟給雑談対話API並紀錄context,如果收到的不是文字訊息,就把DynamoDB裡的cotext刪掉,然後跟你說他不知道你說什麼並回你一個貼圖。把Code部署到AWS Lambda之後設定API Gateway,將API Gateway填回Line Developer中的Webhook URL即可。
有兩個小tips
- API Gateway的建立:
我是使用Claudia來部署我的code,因此才發現Claudia api builder也不支援,所以單純的只用Claudia來做Deploy。連API Gateway都是手動設定的。但不知道為什麼如果我是從Lambda的trigger來建立API Gateway,從line app就會打不過去(但是如果是從Line Developer的verify button的話則可以)。所以只好反過來從API Gateway著手,建立一個新的API Gateway之後將API Gateway的內容綁定到Lambda function。 - Line Developer的verify:Line Developer中webhook URL的設定旁邊有個verify button可以讓你確定webhook URL是否有綁對。他會打一個replyToken是00000000000000000000000000000000的payload到webhook URL,如果沒有特別對這個測試payload設定的話會一直看到verify result是502。這樣是正常的,代表Line確實有去打這個webhook URL,只是code寫得沒那麼好沒判斷reply token是假的的狀況。


沒有留言:
張貼留言